Sunday, 26 June 2011

Sneak Peak - coming soon to CMIT and CEM

I have been working on the Creating Memories in Time Design Team (CMIT) since February this year and to say that I am having a ball would be an understatement.

As you know CHA is coming up soon and although I had a very kind offer to be flown out there, I am so busy doing my day job so unfortunately had to turn it down this time!!

Anyway, back to CHA. The CMIT Design Team have some very exciting projects coming up after CHA so you will not want to miss this. I can't say anything else at this time but I want to give you a sneak peak as to what's in store.

Also the eBay store has an amazing sale on at the moment and it is really not to be missed. There are dies on sale from £1.00 upwards. How cool is that!

Link to the store for the SALE

Sneak Peak

Tuesday, 21 June 2011

Pop up wedding card

I haven't made a wedding card in a while so I thought I'd indulge myself tonight.

This card is very simple yet elegant and easy to make. I have used the Lifestyle Crafts Nesting Hearts and Nesting Scalloped Hearts.


To create the base card, fold a piece of card in half and use the nested scalloped heart to form your card.

With the other nesting heart, cut this out 3 times in red and attach to the front and the 2 inside pages of the card.

Punch out the cake and layer. This is attached to the base card with another strip of card folded evenly into three 2.5cm sections. Attach this to the top half of the inside card and it should stand on it's own.

Just some wording and additional hearts to finish and you are done.

Enjoy, hugs, Wendy X

Lifestyle Crafts / Quickutz Products used:
- Nesting scalloped hearts (DC0043)
- Nesting Hearts (DC0042)
- Wedding Cake (Rev-0202)
- Dragonfly 4 X 8 alphabet
- Khaki Mini Alphabet
- Hearts from Flirt Gift Set

Products Available from:
Creating Everlasting Memories
Creating Memories in Time

Monday, 20 June 2011

Stamping with your Quickutz dies

I know the stamping with your dies technique was around a few year ago but I still love it.

I've been playing tonight with my Chick-A-Dee 4 X 8 alphabet. I basically cut it out in foam, inked it and then stamped onto shrink plastic. The design is very basic but I just wanted to share the effect you can get.

Wendy X

Sunday, 19 June 2011

Girly Spa Day

My sister is the big 40 this year and we are going to celebrate by having a spa day (it will probably end up being a spa weekend :-). I designed an invite for this ocassion.

I have used the paper doll spa doll outfit as the main part of the card. It is so cute and I just love the face mask. Reminds me of the time my sisters dog ate the cucumber off of my eyes whilst having a home facial, LOL!

I also used the Diesel Grand alphabet for the 'S' and Sketchbook for the remaining letters.

Enjoy, Wendy X


Quickutz / Lifestyle Crafts products used:
- Paper Doll (Rev-281)
- Spa Doll (Rev-0298)
- Photo Corners (Rev-0093)
- Nesting Ovals (Ovals-02)
- Diesel Grand Alphabet
- Sketchbook 4 X 8 alphabet

Products available from:
Creating Everlasting Memories
Creating Memories in Time

Saturday, 18 June 2011

Hearts, Shrink Plastic and stamping

I am just loving my shrink plastic, it's just one of those things that I forgot about for ages and then stumbled across it a few weeks ago.


This card is so simple and for all you Quickutz addicts out there that remember Quickutz, this is for you.

Basically, I cut out a large heart in opaque shrink. I then took one of many many flower dies, punched it out in foam and then stamped all over the heart. The heart was then heat shrunk and voila, One pretty patterned heart.

Enjoy, Wendy X

Quickutz / Lifestyle Crafts Products used:
- Nesting Scalloped Squares (4-037)
- Nesting Hearts (DC0042)
- Spray Flowers (DC0075)
- Nesting Ovals (Ovals-02)

Products Available from:
Creating Everlasting Memories
Creating Memories in Time

Happy 4th July

As part of our Design Team challenges this month we were required to create a card for July 4th (American Independence Day) or My niece Chloe's birthday. This card would work for any little girl's birthday!!!

I have used the paper doll outfit with the paperdoll in this card and have just mounted her on some circles I cut using my Lifestyle Crafts Nesting Circles. A added a few final touches with the photo frame corners and Chick-a-Dee 4 X 8 alpha. Also no card fit for a celebration is finished until there is a truck load of bling on it!!!

Enjoy, Wendy X


Quickutz / Lifestyle Crafts products used:
- Nesting Circles (L-CC-005)
- Paper Doll (Rev-0070)
- Cheerleader Unifrom (Rev-0268)
- Photo Frames (Rev-0093)
- Chick-a-Dee 4 X 8 alphabet
- Dragonfly 4 X 8 alphabet for the number 4

Products Available from:
Creating Everlasting Memories
Creating Memories in Time

Tutorial for necklace

I've been asked for a step by step tutorial for the necklace I made a few weeks ago, so here you go:


This necklace was designed using shrink plastic and some of my favourite Quickutz dies


Products used:
- Quickutz Flowers Die Set (6-017)
- Lifestyle Crafts Nesting Circles (L-CC-001)
- Shrink Plastic
- Organza Ribbon
- Jump rings


- Punch out 6 large flowers in the shrink plastic, 3 black and 3 white
- Punch 2 small holes at either side of the flowers
- Once the flowers have been punched out, cut 1.5” circles in the middle of them


- With the 1.5" circles that you cut out from the flowers, choose a smaller circle and punch out another hole in the middle so that effectively you have a ring. In total you need 6 white rings and 6 black.


- You will need to punch out a few more 1.5" circles as you won't have enough from the flowers.


- Shrink all items down and when cool assemble with the jump rings.


- To finish off, add some organza ribbon so that your necklace is the desired length.

Friday, 17 June 2011

Birthday card for 2 year old little girl

It's my husband's cousins daughters birthday today so I made a card to celebrate her birthday.

The front of the card was shaped using the Quickutz cloud border die and I also cut a piece from this die for the cloud inside the card.

I used the Quickutz Castle for the background in the card. The fairy was made using the little paper doll dies and the dress was a mushroom!!!

Enjoy, Wendy!


Quickutz / Lifestyle Crafts products used:
- Cloud Border (Bdr-032)
- Castle (Rev-0113)
- Mushrooms (Rev-0188)
- Pilgrim Girl (KS-0770)
- Doll Body (4Pk-0006)
- Chick-a-Dee 4 X 8 alphabet
- Sketchbook 4 X 8 alphabet

Products available from:
Creating Everlasting Memories
Creating Memories in Time

Thursday, 16 June 2011

Happy 50th Birthday Teresa!

Dear bloggers I have made this project to celebrate Teresa Etchey's 50th birthday tomorrow (17th) over at Creating Everlasting Memories

Teresa is a very kind, considerate and generous person and I just wanted to send my love on her special day. If you're a fan of the store like I am, please drop by to wish her many happy returns.

Enjoy, Wendy X


Quickutz Lifestyle Crafts Products Used:
- Diesel Grand Alphabet
- Flowers - Spray (DC0075)
- Nesting Stars (5-020)

Products available at:
Creating Memories in Time
Creating Everlasting Memories

Sunday, 12 June 2011

Shrink plastic bracelet

I made a little necklace the other day using shrink plastic and thought, why not make a bracelet to go with it.

This was so easy to do. Basically you cut out all the shapes you need, shrink them down and fix everything together with jump rings. The silver chain is just something I picked up at that hobby craft store we don't like to admit we shop in but hey ho, they have what I need and it's fairly cheap too.

My favourite part of the bracelet is the butterflies. It is just a QK 2X2 die but a perfect size. I bent them slightly while the shrink was still warm for effect.


Products used:
- Quickutz Flowers Die Set (6-017)
- Quickutz Butterfly (KS-0919)
- Silver Chain
- Jump rings
- Black and white shrink plastic

Dies Available from:
Creating Everlasting Memories
Creating Memories in Time

Saturday, 11 June 2011

Badges for my niece's birthday

One of my nieces (Hannah) turns 7 next week (can't believe it). For her party today she, she had an afternoon of pampering with her best girlfriends (Auntie Wendy did the hair).

I also had to make the badges for her friends too. What an opportunity to get my fun dies out.


Quickutz / Lifestyle Crafts dies used:
- Nesting Circles (L-CC-001)
- Nesting Scallops (L-CC-005)
- Dragonfly 4 X 8 alphabet
- Flirt Gift Set (dies only)
- Pilgrim Girl (KS-0770)
- Doll Body (4PK-0006)

Products Available from:
Creating Everlasting Memories
Creating Memories in Time

Wednesday, 8 June 2011

A bit more shrink

I am loving playing with the shrink plastic and I have some great projects coming up.

I just made a quick keyring tonight using some coloured shrink.


I cut and then shrunk the flowers, cricle and the nesting scalloped square. However with the square, I pressed an embossing folder in it just after heating.

Remember to cut a small hole in the square before shrinking so it can be added to the keyring.

Products used:
- Quickutz Nesting Scallop Squares (4-037)
- Lifestyle Crafts Nesting Circles (L-CC-001)
- Lifestyle Crafts Blossoms (DC0073)
- Embossing Folder

Products Available from either stores:
Creating Memories in Time
Creating Everlasting Memories

Friday, 3 June 2011

Black and white necklace - instructions

I've been having a little me time in the evenings this week as i have been studying during the day.

This necklace I have made is so easy to make, her are the items I used:
- Quickutz Flowers Die Set (6-017)
- Lifestyle Crafts Nesting Circles (L-CC-001)
- Shrink Plastic
- Organza Ribbon
- Jump rings


Instructions
- Using the largest flower in the 'Flowers Die Set', cut out 6 flowers in black and white shrink plastic

- Cut a hole in the middle of each flower using the 1.5" circle die. Put the cut out circles to one side as you will need these later.

- On two opposite petals on the flowers punch a small hole. Remember the hole will shrink so it needs to be approx 3mm wide.

- With the 1.5" circles that you cut out from the flowers, choose a smaller circle and punch out another hole in the middle so that effectively you have a ring. In total you need 6 white rings and 6 black. You will need to punch out a few more 1.5" circles as you won't have enough from the flowers.

- Shrink all items down and when cool assemble with the jump rings.

- To finish off, add some organza ribbon so that your necklace is the desired length.

Dies Available From:
Creating Everlasting Memories

Thursday, 2 June 2011

Stepped card for Dad

I'm having a little time out this morning as my brain has been overloaded with information.

I have made this little card for Fathers Day. It's only a few weeks away so I thought I'd get started.


Instructions:
First take a piece of green card measuring 5.5" by 9". Score at the following intervals 2", 2", 1.5", 1.5" and 1". Fold at the score lines and you have the base of your card. Take a piece of A4 acetate and trim so that it measures 5.5" (same as the card). Fold the acetate in half and put to one side.

To make the scalloped edges, I used the card from the Special Delivery Gift Set. You will need to stick the from and top pieces to the outside of the card so put these to one side. However, on the middle step attach this first.

Cut out the animals and letters and attach to the card with glue.

Attach the acetate to the front and the back of the base with double sided tape. Hide the tape with the scalloped edges. Finally attach a piece of the scalloped card to the top of the card by folding it over and gluing in place.

Lifestyle Crafts / Quickutz Products used:
- Quickutz Special Delivery Gift Set (SGS-10)
- Rainbow 4X8 alphabet
- CK Handprint Shadow
- Lion (KS-0878)
- Giraffe (KS-0877)

Products Available from:
Creating Memories in Time

Monday, 30 May 2011

Long time no post!!!

Hi guys,

I thought I should just post a note as to why I haven't posted in a while.

I have a big exam on 6th June and I am busy revising. It's my last exam ever so I have to pass.

Roll on the 7th June when I can get back to my cards

Wendy X

Friday, 6 May 2011

Lifestyle Crafts $1000 giveaway

OMG Lifestyle Crafts are giving away $1000 dollars worth of dies and supplies in aid of National Scrapbooking Day tomorrow. Be sure to log onto their blog and leave a comment for a chance to win this truly fabulous prize!!!


Link
Lifestyle crafts $1000 giveaway

Wednesday, 4 May 2011

Lifestyle Crafts Mini Pizza box


Lifestyle Crafts are giving away a fabulous Mini Pizza Box die as part of National Scrapbooking Week.

I sooooo want this die!!!

Click on link below.
Pizza Box Giveaway

Monday, 2 May 2011

Christmas table place setting / favour

It's such a long time until Christmas and I really love making Christmas cards / projects. I got this snowman just after Christmas last year so this is the first time I've got to use him.

Each layer excluding the hat and the scarf was layered 3 times to give the snowman some stability. I then cut out the take out box and assembled and attached to the snowman. This enabled him to stand up.

I then used the nesting scallops for the snowballs and added the name using the Banana Split alphabet.

You could put a little gift in the box for your guests. So you have a place setting and a favour in one!!

Enjoy, Wendy X


Lifestyle Crafts products used:
- Snowman Kit (DC0017)
- Take Out Box (DC0048)
- Nesting Scallops (L-CC-005)
- Banana Split 4 X 8 Alphabet

Products available from:
Creating Everlasting Memories

Sunday, 1 May 2011

Anniversary card for mum and dad

It's my parents anniversary tomorrow (41 years) so I made a special card for them.

I've gone for a simple and elegant design with the word 'Love' as they are as much in love now as the day they met.

I used the Chocolate 4 X 8 alphabet for the letters. It is a yummy font indeed.

Enjoy, Wendy X


Lifestyle Crafts products used:
- Nesting Rounded Squares (L-CC-002)
- Nesting Hearts (DC0042)
- Chocolate 4 X 8 alphabet

Products Available from:
Creating Everlasting Memories

Friday, 29 April 2011

Cute Baby Card

After spending all morning and afternoon in front of the TV, I thought I'd get my creative juices flowing in my crafts room.

I didn't get chance to use the chick and Egg die at Easter, so I chose to use the Egg Shell part of the die on my card.

To make the card and the layers, I used the nesting rounded squre dies. The baby's head was made using the pilgrim girl die. The greeting is an old rub on I had lying around but this was attached to the nesting ovals die.

Enjoy, Wendy X


Lifestyle Crafts products used:
- Nesting Round Squares (L-CC-002)
- Chick (REV-0184)
- Pilgrim Girl (KS-0770)

Products available from:
Creating Everlasting Memories

A beautiful Day

Well, what a wonderful day. A truly amazing Royal Wedding today and I've been glued to the TV since 7am. Congratulations William and Kate, what a truly Stunning Couple!!!

Wednesday, 27 April 2011

Pretty Pink Roses

Roses seem to be the 'in thing' at the moment and there are a lot of dies out there to help you make them. However, I used the nesting scallops to make these little beauties as it gives them more of a rose like look.


All you need to do is cut out the scallop, cut a spiral into he scallop (see the Roses dies from Lifestyle Crafts to see how to do this). You then wind the spiral outside in quite tightly, then release the flower when you have wound it all the way in. There will be a little base for you to glue you rose to.

I then used the short fat leaf from the leaves die set to finish off my rose. You can fold or score the leaves to make them look more realistic. You need to cut out four of the leaves and glue them in a cross shape for your rose to sit on. You need another 2 leaves for each stem.

To make the stems, take some kebab skewers, cut them down the the size you like and then cover them in brown grossgrain ribbon. To attach them to the flowers, make a hole all the way through the rose and the leaves, glue the pointy end of the skewer and then post this up through the bottom of the rose.

I made a makeshift vase out of some acetate but you could use a small vase you already have.

Enjoy,Wendy X


Lifestyle Crafts products used:
- Nesting Scallops (L-CC-005)
- Leaves (DC0077)

Products Available from:
Creating Everlastng Memories

Friday, 22 April 2011

New Home

I just got the Lifestyle Crafts Nesting Rounded Squares and the Leaves and couldn't wait to do something with them.

I always love these nesting dies as they are fantastic for layering as the increments in size they come in perfect. I also made the base card with these dies.

I used an old favourirte die of my (the house) to make this great new home card. If you haven't spotted it, the tree in the background is from the leaves dies (DC0077).

Enjoy, Wendy X


Lifestyle Crafts / Quickutz dies used:
- Nesting Rounded Squares (L-CC-002)
- Leaves (DC0077)
- House (KS-0960)
- Dragonfly 4 X 8 alphabet

Dies Available from:
Creating Everlasting Memories

Rich Chocolate Cake with no calories - Tutorial

As promised, here is my full tutorial for the cake I made last week.


Supplies


- Lifestyle Crafts Nesting Circles (L-CC-001)
- Lifestyle Crafts Nesting Scallops (L-CC-005)
- Lifestyle Crafts Blossoms (DC0073)
- Bazzill Bling October cardstock
- Bazzill Bling Flat Broke cardstock
- Bazzill Bling Glass Slipper cardstock
- Sparkly gems

Step 1


Cut out in the Flat Broke Cardstock
- two 5” circles
- two 4” circles
- two 3” circles
- 3 strips in the following sizes, (12” x 2”) , ( 12” x 1 and 7/8”) and (12” x 1 and 6/8”)

Cut out in the October Cardstock
- Approx 25 of the smallest blossom
- One of the 2nd smallest blossom
- One of the 3rd smallest blossom

Cut out in the Glass Slipper cardstock
- One 5” scallop
- 2 pieces of 12” x 1cm strips


Step 2


- On each of the 3 12” card strips score 1cm down ach side
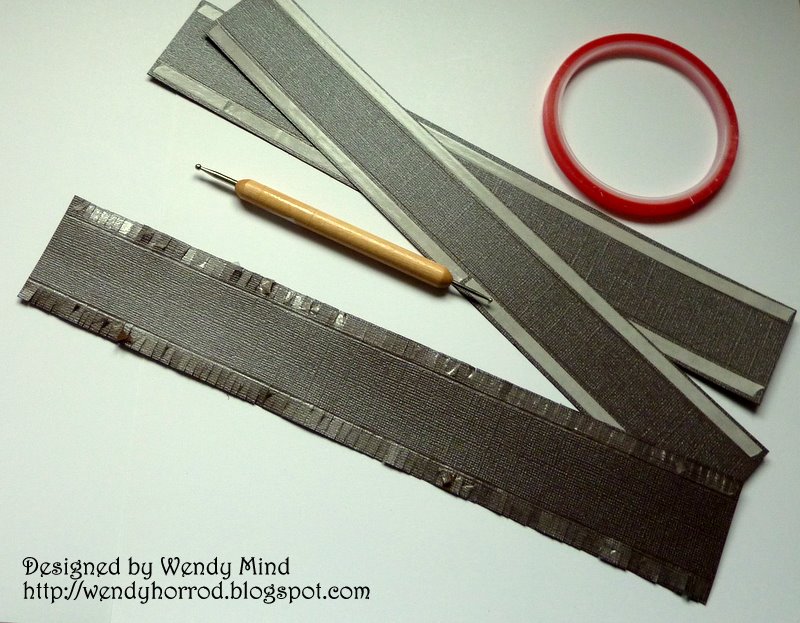
- Stick double sided tape on both edges of each of the 3 strips (it is important to do this before you start fringing the cardstock
- Trim at small intervals on each edge of all 3 strips so you have a ‘fringed’ look


Step 3


- Start to attach the strips to each of the circles by bending the card round to fit. The widest width strip will be for the largest circle etc etc.


Step 4


- Once you have attached the card strips to the bottom circle, the top circle will fit on nicely


Step 5


- Once all 3 layers of the cake have been put together attach them on top of each other with glue and then attach to the scallop.
- Attach the Glass slipper strips of card around the bottom of each layer of the cake.


Step 6


- To finish pinch each of the petals of the small blossoms, attach them to the cake and add a sparkly gem.
- To make the flower on the top of the cake, layer 3 of the smallest blossoms on top of each other and then adhere to the cake.

Lifestyle Crafts products avaialble from:
Creating Everlasting Memories

Tuesday, 19 April 2011

Birthday Princess

It's a friends grandaughters next week and I was commissioned to make a card for her.

This card is fun and cute and perfect for a little girls Birthday.

To make the fairy princesses I used the following Quickutz dies:
- Party Hat (QC-0009) for the dress
- Dolly Body (4pk-0006) for the arms and legs
- Pilgrim Girl (KS-0550) for the head
- Fashion Doll set (050-4) for the hair
- Fairy tale costumes (REV-0263-D) for the tiara

They may take a little whle ti make, but if you want to make many of the fairies then get a little production line running. First the legs, then the heads, etc.

Enjoy, Wendy X


Lifestyle Crafts / Quickutz products used:
- Party Hat (QC-0009) for the dress
- Dolly Body (4pk-0006) for the arms and legs
- Pilgrim Girl (KS-0550) for the head
- Fashion Doll set (050-4) for the hair
- Fairy tale costumes (REV-0263-D) for the tiara
- Flower Border (BDR-031)
- Dragonfly 4 X 8 alphabet

Products available from:
Creating Everlasting Memories

Sunday, 17 April 2011

My Sisters Birthday

It's my little sisters Birthday tomorrow, so I had to make her a card.

I am using my favourite dies again (nesting scallops and circles) and the Blossoms from the Fresh Start release.

I made the card using the nesting scallops and then used the nesting circles for the base on the card. I used the branch and berries for the foliage for my blossoms to sit on. Finally I used the Paperdoll 4 X 8 alphabet for the wording.


Enjoy, Wendy X

Lifestyle Crafts Products used:
- Nesting Scallops (L-CC-005)
- Nesting Circles (L-CC-001)
- Branch and Berries (DC0015)
- Paperdoll 4 X 8 alphabet

Products Available from:
Creating Everlasting Memories

Ahoy There!!!

I'm a really big fan of Lifestyle Crafts Cupcake Wrappers. There are so many possibilities and I'll shall be using them all the time over the summer for my 3 gorgeous niece's birthdays.

Anyway, this one is for a boys birthday. Nautical seems to be quite the theme at the moment and it inspired me to make this pirate style cupcake wrapper.

I have basically cut out the wrapper 3 times and layered them on top of each other to give the effect of the sea. I then cut out various items and inserted them into the wrapper. The map is my favourite. I used a label die to cut it, scrunched it up and then added some ink around the edge to make it look authentic. Finally, some wording using the License Plate 4 X 8 alphabet.

Enjoy, Wendy!!


Lifestyle Crafts Products used:
- Artisan Cupcake Wrapper (L-CC-011)
- Nesting Frames (L-CC-014)
- Treasure Chest(KS-0782)
- Holly (KS-0979) - for the foliage
- License Plate 4 X 8 Alphabet

Products Available from:
Creating Everlasting Memories

Friday, 15 April 2011

Card for mum

I was inspired after creating my cake to make a card to match. again, this card can be for a birthday or Mothers day. I made the flowers using the Lifestyle Crafts Blossoms Dies(DC0073). I used the 3 smallest flowers, folded the petals and then layered them. All finished off with some bling!!! The alphabet is Dragonfly 4 X8 alpha.

Enjoy, Wendy!


Lifestyle crafts Peoducts used:
- Blossoms(DC0073)
- Dragonfly 4 X 8 alphabet

Products available from:
Creating Everlasting Memories

Thursday, 14 April 2011

Keepsake for mum

I'm still tidying up my Mothers Day projects and have one final little design. This is basically a keepsake for mum (be it Mothers Day or a birthday).

I used the mini accordian die and nesting scallops to make the base of the keepsake. I cut out a few photos to attach. I also used the Sketchbook 4 X 8 alphabet for the letters.

Enjoy, Wendy X


Lifestyle Crafts Products used:
- Mini accordian (058-1)
- Nesting Scallops (L-CC-005)
- Sketchbook 4 X 8 Alphabet

Products Available from
Creating Everlasting Memories

Wednesday, 13 April 2011

Rich Chocolate Cake with no calories!!!

Well, I couldn't help but post this design. I am still creating for my US Mothers Day and I thought that a chocolate cake with no calories would be ideal.

We always buy cakes for occassions in our family but no one eats them as they always on diets, or like me Gluten Free!!

This cake was made simply by using the Lifestyle Crafts Nesting Circles, Nesting Scallops and the Blossoms from the Fresh Start rlease. You also need a few strips of paper too.

I am going to post a full tutorial on my blog later this week, with photos etc.

Enjoy, Wendy!


Lifestyle Crafts products used:
- Nesting Circles (L-CC-001)
- Nesting Scallops (L-CC-005)
- Blossoms (DC0073)

Products Available from:
Creating Everlasting Memories

Sunday, 10 April 2011

Something Different

What a beautiful day today. The sun is shining, top temperature is going to be 21C. It's only April and it's not the usual weather we'd usually expect in the UK. I am certainly not complaining.

I thought I'd get away from my usual pinky colours today. Time for a change I think.

I was going through my scraps drawers today and found this lovely red corrugated card. It cuts beautifully and doesn't squash the overal rib effect of the card, even with the alphabet I used.

For the main focus of the card, I used the blossoms from the Fresh Start Release. Basically, I folded the petals in half to give them a 3D effect. I then layered the flowers and fixed them together with a brad.

The main card was made with the Nesting Scallops dies. These dies are amazing and so versatile.

Enjoy, Wendy X


Lifestyle Crafts Products used:
- Nesting Scallops (L-CC-005)
- Blossoms (DC0073)
- Sketchbook 4 X 8 alphabet

Products Available from:
Creating Everlasting Memories

Saturday, 9 April 2011

Photo Frame for Mum

As you know I work on the Creating Memories in Time (CMIT) Design Team. This month I am going to be making projects for Mothers Day as it is a little later in the US than here.

I have made a photo frame as one of my projects and the tutorial for this will follow on the CMIT blog later in the month.

This doesn't necessarily have to be for Mothers Day it could be a birthday too.

Enjoy, Wendy X


Lifestyle Crafts products used:
- Blossoms (DC0073)
- Flower Border (Bdr-031)
- Aquarius 4 X 8 alphabet

Products available from:
Creating Everlasting Memories

Thursday, 7 April 2011

New Arrival

I always make baby cards to congratulate people so I thought it was about time to make a birth announcement card.

I just got the Lifestyle Crafts Essentials Mini Collection and it is super cute. I just love the little door that opens.

I have put a photo of my little niece behind it (she was a beauty as a baby), a little bit minxy now. I do love her dearly.

The letters have been done using the Sketchbook 4 X 8 alphabet and I've layered them a few times for a 3D effect.

I also wanted to thank everyone for their lovely comments on my blog recently too. You are all so kind and it gives me the motivation to make more stuff!!!

Enjoy, Wendy X


Lifestyle Crafts Products used:
- Essentials Mini Collection (L-CC-029)
- Pilgrim Die (KS-0770) for the baby
- Sketchbook 4 X 8 alphabet

Products Available from:
Creating Everlasting Memories